When tissues are removed from the body, the process of autolysis occurs rapidly. Thus it is important to FIX to process and wax embed the tissues, OR FREEZE, as soon as possible, after removal from the body, in order to PRESERVE tissue morphology for histopathologic examination.
Here are some good links that you can look up in order to get guidelines for mouse necropsy:
http://www.deltagen.com/target/histologyatlas/HistologyAtlas.html
http://www.niaid.nih.gov/labsandresources/labs/aboutlabs/cmb/Pages/default.aspx
http://www.fhcrc.org/labs/fero/Protocols/Necropsy.htm
http://vetneuromuscular.ucsd.edu
This site is a good reference laboratory for help with neuromuscular evaluations--this includes properly oriented and processed muscle and nerve. Call them for help with planning experiments involving muscle and nerve.
http://www.item.fraunhofer.de/reni/trimming/TR_F.htm
This last one is a good site with diagrams to help with trimming organs before or after FIXATION.
Summary of optimum handling of mouse tissues:
- The tissues may be FROZEN as outlined in the "Freezing protocol".
- If the tissues are to be FIXED, PROCESSED, EMBEDED and SECTIONED, the following procedures are recommended:
- BRAIN: The animal is perfused first with PBS (phosphate buffered saline) and then with 10% buffered formalin, before opening the skull to remove the BRAIN for examination after processing, embedding and sectioning. Perfusion is best for examination of the brain, to avoid artifacts introduced during removal from the skull.
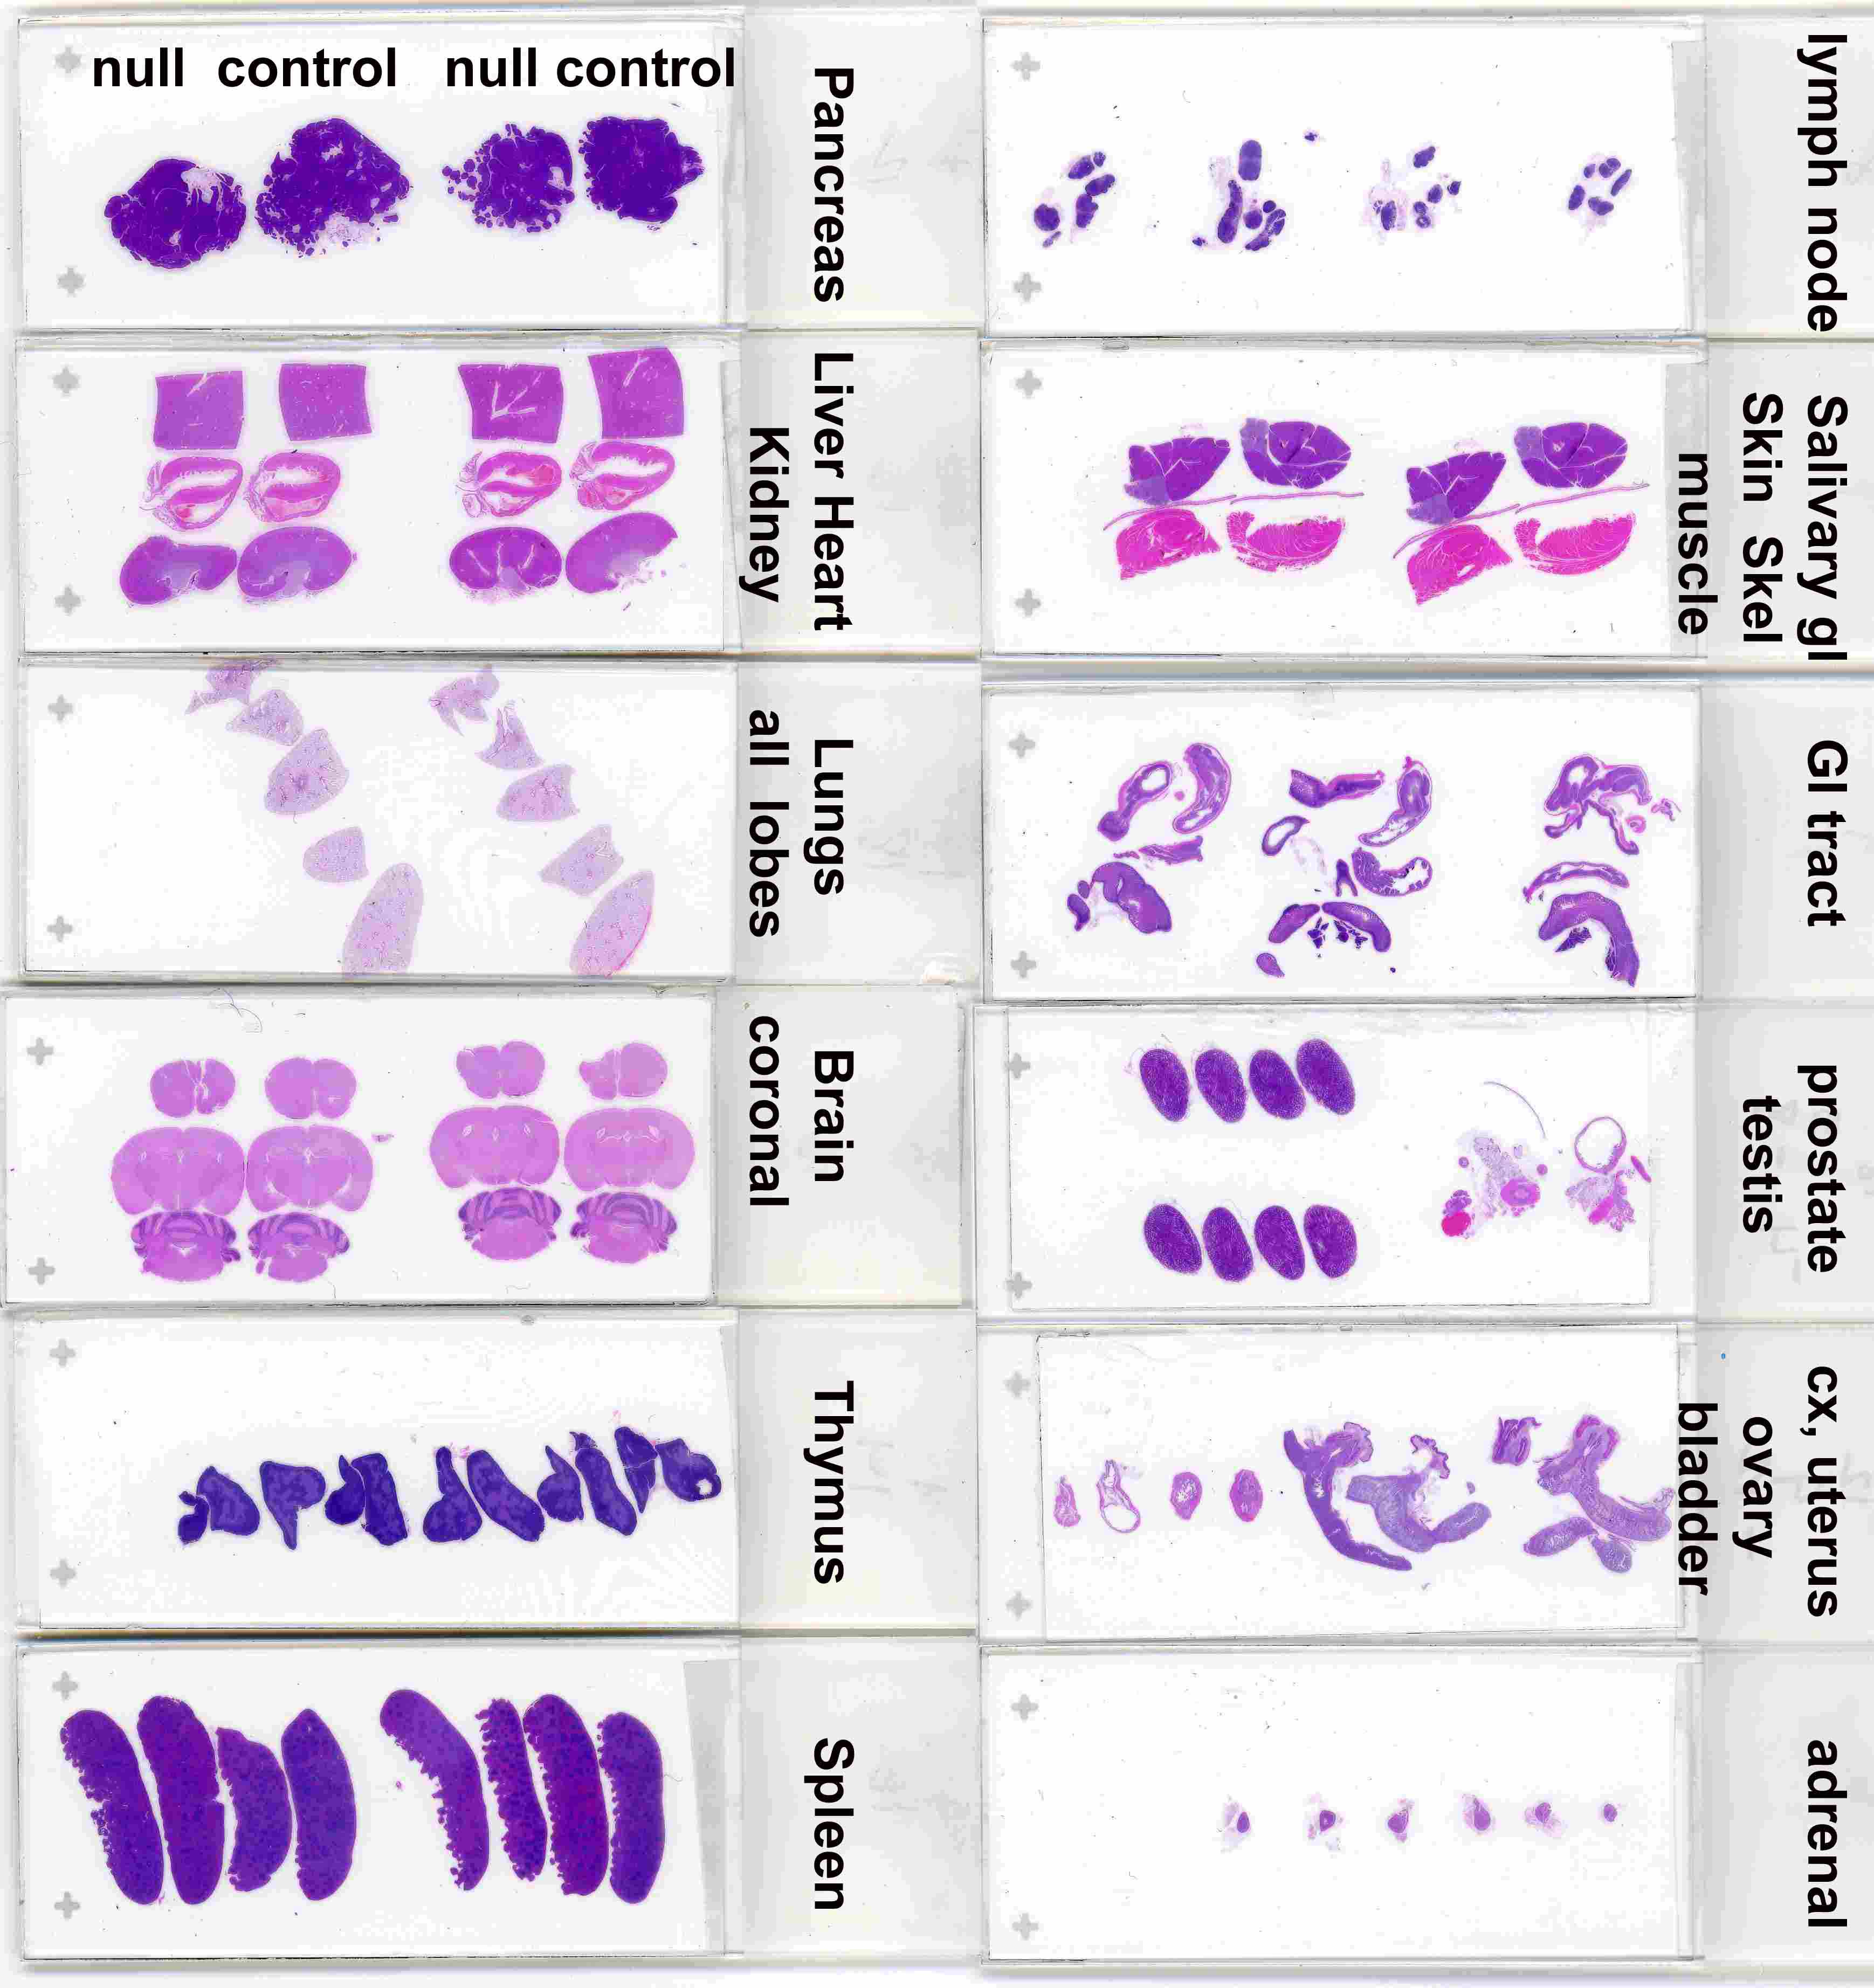
- The SKIN, PANCREAS, SPLEEN, THYMUS are flattened between sponges in labeled cassettes, and fixed, for processing, embedding and sectioning. After processing, the SKIN is carefully embedded on edge.
- KIDNEYS, LIVER, HEART: Halve the KIDNEYS and place flat surface down, with a square segment of LIVER, and the two halves of the HEART, in labeled cassettes, and fix, for processing, embedding and sectioning.
- LUNGS: If the animal is not perfused, the LUNGS are inflated with fixative; each lobe is separated and laid flat between sponges in labeled cassettes, and fixed, for processing, embedding and sectioning.
- The OVARIES, ADRENALS and LYMPH NODES are placed in labeled cassettes, and fixed, for processing, embedding and sectioning. The TESTES need to be fixed in Bouin's solution for at least 6 hours before transferring to 70% alcohol in labeled cassettes, for processing, embedding and sectioning. These small organs are processed using a “Short” protocol to generate good sections
- GUT: The stomach and esophagus should be opened to allow fixative to penetrate and each half laid flat in a labeled cassette. The small intestine should be sampled with Peyer's patches included, from different places. The openings at each ends of the tubes selected, will allow fixative to penetrate. However, the COLON definitely needs to be opened and rolled as described below, before fixing and processing, embedding and sectioning.
- Bones need to be de-calcified--see below. If immunostains are needed on bone marrow, the bones should be decalcified in EDTA, see below.
- Tumor samples should be sliced thin, so that the fixative can do its job well, and placed in labeled cassettes, and fixed, for processing, embedding and sectioning.
- If IMMUNOSTAINS are planned, do not fix for more than 24 hours in 10% buffered formalin, before proceeding to immerse in 70% alcohol, in labeled cassettes, and fixed, for processing, embedding and sectioning.
- If immunostains are planned, make sure the POSITIVE and NEGATIVE CONTROLS are processed similarly. If TISSUE CULTURE CELLS are the positive and negative controls, plan to grow up 100 million cells, wash away media, and re-suspend each pellet of cells, in 10% buffered formalin for 24 hours. Then plan to centrifuge to a pellet each set of cells and embed in 1% Agarose in water, place solidified Agarose with the pellet of cells between sponges in labeled cassettes, for processing, embedding and sectioning. Two or more sets of cells may be sectioned onto slides for use as negative and positive controls in immuno-histochemistry (see IHC protocols for more details).
- ADIPOSE TISSUES: Frozen sections are difficult. The best morphology is obtained if the adipose tissue is enclosed between tissue cassette sponges and placed in properly labeled cassettes and fixed in 10% buffered formalin for 24 hours before being transferred to 70% alcohol for processing, embedding and paraffin sections.
NOW TO DEMONSTRATE THE DIFFERENT TECHNIQUES THAT MUST BE USED, if one is working with FROZEN tissues OR with FIXED, PROCESSED TISSUES (see next section):
FROZEN tissues
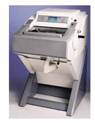
Frozen tissues that are correctly frozen with OCT compund, in a dry ice/isopentane slurry (see protocol) are cryo-sectioned in a CRYOSTAT--similar to the one shown in the photograph.
Frozen sections are best used for immunohistochemistry assays, but morphologic detail is not well preserved usually
The cabinet is kept cooled so that frozen sections (at 5 microns thick upto 20 microns thick) may be cut using temperatures that vary from minus 15 degrees (for solid organs like spleen, liver, kidney, heart) or at minus 30 degrees (for delicate or difficult to section organs or tissue, like brain or adipose tissue).
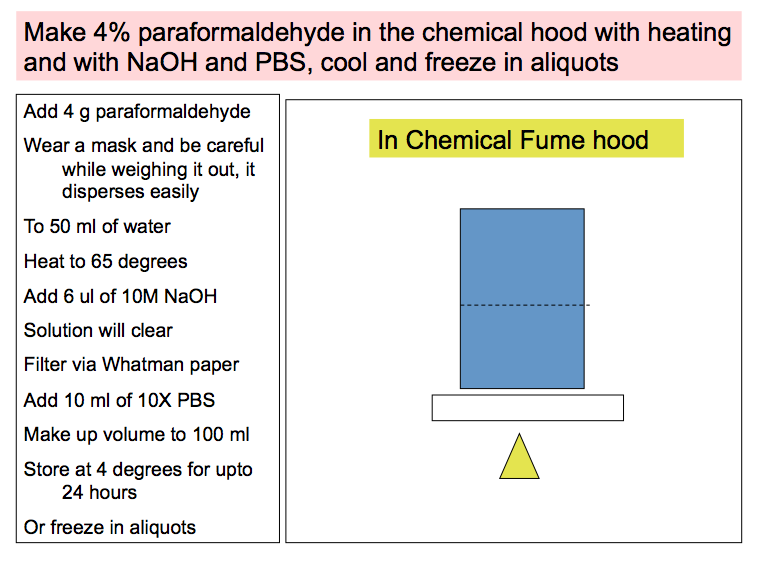
Tissues, that are FROZEN for histopathologic use, MUST BE FROZEN using specific protocols, described in the "PROTOCOLS" section.
OCT (Optimum Cutting Temperature) Compound, VWR Cat No: 25608-930) is used to surround and CRYOPROTECT the fresh tissue, (make sure that the tissue juices have been thoroughly blotted away from around the tissue about to be frozen) which is placed in a vinyl mold with more OCT, and then this is immersed in a bath of dry ice and 2 methyl butane (isopentane Fisher Cat. No. 03551-4) NOTE: Remember that one MUST NOT USE ETHANOLwith the dry ice---Ethanol DOES NOT FREEZE!!!!).
Oil Red O stains on adipose tissue have to be performed on frozen material. Remember, it is technically very challenging to cut frozen sections of adipose tissue, however, one has to suffer through that in order to do the Oil Red O stains
If you would like to detect the presence of GFP label in the tissues, you MUST perfusion fix the animal after sacrifice, before freezing the organs.
Movie Link Uses
Quicktime
After the OCT turns white, the frozen tissue block is snapped out of the mold, placed in labeled plastic bags, in a box in the minus eighty freezer, until the need arises for frozen sections. Many investigators, additionally, place thinly sliced fresh, paraformaldehyde fixed tissues in 30% sucrose, in order to cryoprotect the tissues, before freezing in OCT. In our experience, cryoprotection in sucrose has not been a necessity for many of the organs we have analysed
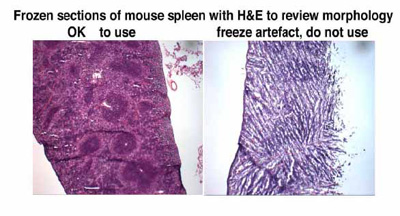
IF NOT FROZEN WELL, the tissues will SHATTER during sectioning, and will show FREEZE ARTEFACTS and thus cannot be used for any immunostaining assays. Remember----FROZEN tissues are cryo-sectioned, in a CRYOSTAT, and FROZEN sections, at 5 micron or 10 micron or 20 microns, are thaw mounted, onto coated glass slides, for use in immunohistochemistry assays, using a variety of markers.
PARAFFIN SECTIONS:
Much better morphologic detail is obtained when examining standardly fixed, processed, stained PARAFFIN SECTIONS. It is best to label the cassettes yourself, using the indelible marker (NOT A SHARPIE, the ink of which is soluble in the solvents that are used to process the tissues into paraffin).
It is also EXTREMELY IMPORTANT that you confer with the histotechnologist when you deliver the sample so that both of you can determine the correct orientation of the tissues, so that you will receive properly oriented, embedded, sectioned and stained slides to review and photograph. Remember, fixatives take a loooooooong time to infiltrate tissue, so the thinner the slices that are placed in the labeled cassette, the better fixed they will be, and thus will result in better morphologic detail on the stained sections.
However, IF THERE IS A PLAN TO USE THE FIXED TISSUE SECTIONS FOR IMMUNOHISTOCHEMICAL ASSAYS, make sure you confer with the histotechnologist ahead of time, and remember ---- do not fix for longer than 24 hours in paraformaldehyde or formalin. Transfer to 70% alcohol and take to the histology lab for immediate processing, in order to be able to detect non-denatured epitopes easily.
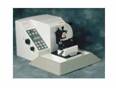
A bench top microtome is used to make these paraffin sections, as shown in the photo.
To obtain the best morphologic detail of fixed sections, it is VERY IMPORTANT that fresh tissue is THINLY SLICED before being placed into the fixative solution of choice, so that the fixative can do its job properly.
Fix thin slices of tissue labeled cassettes in 10 volumes of fixative for at least 24 hours and transfer to 70% alcohol for processing into paraffin.
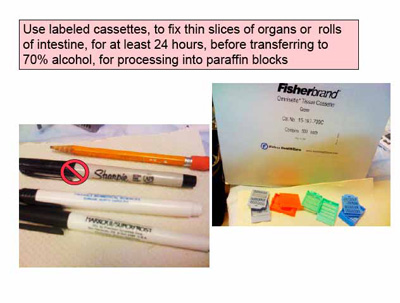
The THIN slices of tissue are then placed FLAT into plastic cassettes (Fisher Catalog #15-182-500E)LABELED with #2 pencil or Secureline II pens - Fisher Cat.# 1490530. DO NOT use Sharpies or lab markers, and immerse in fixative that is at least 10 times the volume of the tissue to be fixed. The cassettes will hold tissues in fixative for less than 24 hours, when they should be transferred into 70% alcohol, until they are processed, embedded in PARAFFIN WAX, and sectioned into 3-5 micron thin slices, onto COATED glass slides, using a microtome, at room temperature, for staining, and analysis of morphologic detail.
Paraffin blocks of tissue may be stored at room temperature for decades and form an important archive in retrospective analyses. Paraffin sections may be used in immunohistochemistry assays, but some antibodies require unmasking and/or amplification before epitopes in paraffin sections are detectable.
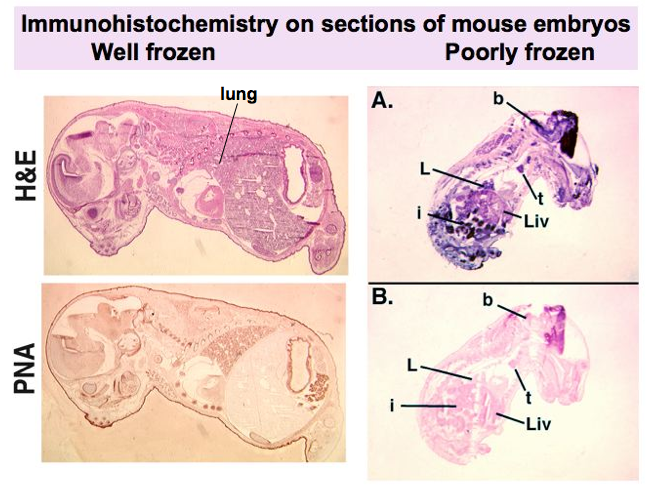
Well and poorly frozen embryos
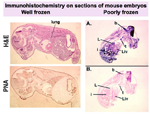
view full image
Examination of MOUSE EMBRYOS, using histological methods:
Most embryos may be FROZEN in OCT blocks as described above, and sectioned sagitally, with H&Es (hematoxylin and eosin stains, see "Protocols") for viewing morphologic landmarks. Comparisons of wild type and mutant embryos are possible if multiple sections are viewed. Alternatively, coronal sections, from the crown to the rump, will also demonstrate abnormalities. These frozen sections can then be used in immunostaining assays.
Paraffin sections provide good morphology, thus it is really important, to FIX the larger embryos REALLY WELL. It may be necessary to open the abdomen a little to allow the fixative to penetrate.
Fixing in Bouin's solution (see below) allows rapid fixation and processing. However, do not let them sit in Bouin's for too long otherwise the tissue gets hard and becomes challenging to process and section.
Fixation, orienting and processing of Mouse Embryos:
Fixation: (P.Mellon lab UCSD)
Use a freshly made mixture of 6:3:1 of
---Absolute Alcohol: 37% formaldehyde(Fisher F79-4): Glaclal Acetic Acid
It’s made fresh every time.
Use 10 ml for small embryos and 15 ml for larger embryos
Place on a rotator overnight at 4 degrees.
The next day, if the samples are not white, let them fix again in fresh fixative
for another 24 hours.
The next day, wash with 70% alcohol until the acetic acid smell is gone.
And then...
Embedding and orienting in Agarose:
Make 1% agarose is made in water
Put the specimen in the mold ---Biopsy molds (Tissue -Tek #4565,
disposable vinyl specimen molds 10 mm x10 mm x 5 mm)
Palce the hot agarose on the specimen and very quickly orient the
specimen under the microscope
The agarose will solidify fast
Pop out the little formed square
place in the plastic embedding cassette Fisher cat# 15-197-700E
appropriately labeled with
either a #2 soft graphite pencil
or with the Secureline organic-solvent-resistent-pen
(Fisher Cat# 450-20-FSC)
Drop into 70% alcohol
and get it processed and embedded for paraffin sections
TISSUE CULTURE GROWN CELLS, as controls for immunohistology experiments:
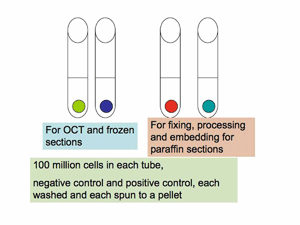
FROZEN "TISSUE" CONTROL: Tissue culture grown cells (10-8, or 100 million cells will provide a good size pellet) should be spun down into a pellet, washed from media, spun into a pellet and used as a block of "tissue" to be FROZEN in OCT as though freezing a small piece of tissue.
Plan to provide 100 million cells that do not express the protein of interest (negative control) and also to provide 100 million cells that DO express the protein of interest (Positive control).
FIXED "TISSUE" CONTROL: The pellet of cells may be resuspended in freshly made 4% paraformaldehyde and allowed to fix for less than 6-24 hours, spun to pellet, scraped onto lens paper, which is folded and enclosed in ShurMark or pencil labeled cassettes, and submitted for processing into paraffin blocks.
Again, plan to provide 100 million cells that do not express the protein of interest (negative control) and also to provide 100 million cells that DO express the protein of interest (Positive control).
Sections of these cell pellets, are an ESSENTIAL control for Immunoassays on tissues
FIXATIVES:
Different fixatives are used for different purposes.
Fix THIN slices of tissue in 10 times its volume of fixative, for AT LEAST 24 hours. Take the cassettes with the enclosed tissue in fixative, to the Histology lab (Let them know ahead of time) so that the tissues can be processed immediately, and embedded into paraffin blocks, for paraffin sectioning.
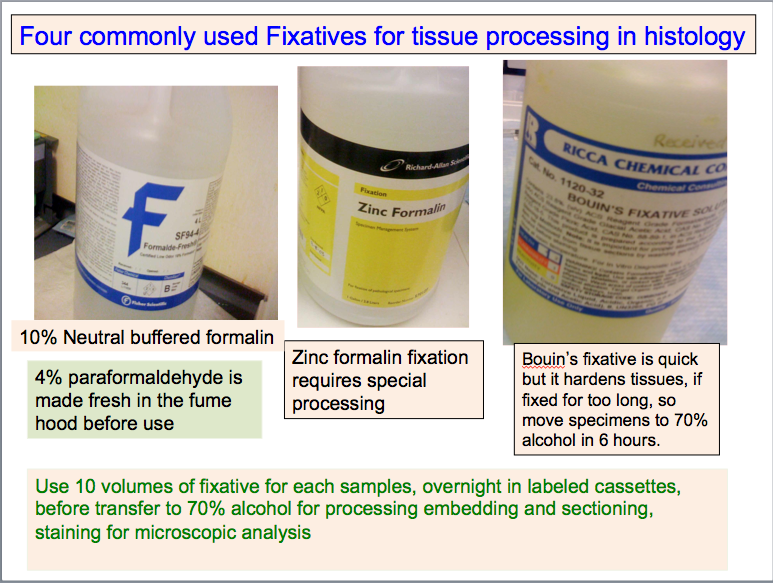
1. 10% buffered formalin is the most commonly used fixative (Fisher Catalog#SF93-4). However, you must remember that the fixative only penetrates into the tissue very slowly (?1 mm per hour?) and thus, the tissue MUST be SLICED THIN enough, in order for the Fixative to do its job properly.
2. FRESHLY MADE 4% paraformaldehyde, also fixes well and is used commonly, for perfusion fixation, which renders good morphologic preparations.
3. Bouin's fixative fixes fast, and is especially useful when fixing embryos, that have been opened a little to allow the fixative to infiltrate. However, Bouin's fixative, because it fixes so well, MUST be removed from contact with the tissue after about SIX hours of fixation, and the tissue MUST be rinsed in 70% alcohol, continuing to change the alcohol, until the yellow color is not discernible.
If tissues are allowed to fix in Bouin's solution for too long, they will become hard and brittle, and challenging to section, resulting in poorly prepared sections
4. Zinc containing fixatives are used to enhance immunohistochemistry assays.
5. There are other fixatives in use, and information on these are available
DETECTION OF INCOPORATED GFP (GREEN FLUORESCENT PROTEIN) IN TISSUE SECTIONS:
The experience in the lab has been that GFP is very soluble, even in the water of condensation that forms when they try to do frozen sections on to slides unless it is extremely abundant.
So it is best to perfusion fix the animal, before removing organs to freeze for frozen sectioning and examination for GFP fluorescence.
If you already have frozen mouse tissues for evaluation of GFP incorporation, which are unfixed you should plan to extract and test for presence of GFP fluorescence, using the uv fluorometer.
See GFP Protocol for more information
BRAIN Brain morphology is best examined on perfused, fixed specimens. Don't forget to remove the PITUITARY, from the Sella Turcica, after removing the brain. The pituitary is small and will need special attention, remember to confer with the Histology personnel about this.
 To Repeat: It is recommended that fixation with PERFUSION of the whole animal is performed, for best morphology and to avoid freeze arterfacts. To optimally examine brain, plan to perfuse animal with fixative, first with PBS, to deplete all of the blood, and then perfuse with freshly made 4% paraformaldehyde, to fix all the organs. If the fixed tissues are to be frozen for use in immunohistology assays, after fixation, they MUST be immersed in 30% sucrose at 4 degrees, until they sink, in order to cryoprotect and prevent freeze artefact and loss of tissue architecture.
Perfusion is done using a perfusion pump, via the left ventricle, first with phosphate buffered saline, and then with freshly prepared 4% paraformaldehyde. Use a butterfly needle to enter the left ventricle. Use scissors to nick open the right atrium, so that blood flows out as the circulation is replaced.
If the perfusion is successful, the liver will blanch as the blood is replaced and then the kidneys. After this is observed, the buffer solution is replaced with fixative which is perfused through the body circulation for another 5-10 minutes.
The cranium is opened by cutting around the perimeter, holding on to the foramen magnum, and it is lifted up to reveal the brain. This is removed carefully, for further fixation or for freezing using the recommended protocol.
TRANSVERSE sections provide a view of the whole brain, from the olfactory lobes, to the cerebellum, especially if different STEP sections and made and stained for viewing.
CORONAL sections, if made at specific sites, as shown on the picture, allow similar areas to be examined, so that comparisons can be between littermate controls and from mutant animals. It is recommended that coronal sections of the entire brain be examined in order to pick up small abnormalities. Examination using special stains and immunohistochemistry will help dissect out abnormalities better.
Look at the website www.mbl.org for more information.
SAGITTAL sections are made for easier viewing of each half of the brain, that can now be viewed from caudal to rostral aspects, to detect any obvious abnormalities.
Sections of Brain may then be stained using the different special stains available, such as LFB (Luxol Fast Blue, which highlights myelin) etc.
Immunohistochemistry assays that will help in the analyses include anti GFAP (glial fibrillary acidic protein) which marks astrocytes; anti MBP (myelin Basic Protein) which marks myelin; anti CD68, which marks macrophages (microglia) etc.
LUNG morphology is best examined after perfusion of fixative through the trachea, to inflate all lobes.
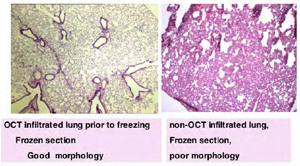
If FROZEN sections are needed, IT IS REALLY IMPORTANT to inflate the lungs with a mixture of 1:1 OCT/PBS BEFORE freezing in a slurry of dry ice/ 2-methyl butane. Otherwise it is really difficult to obtain good frozen sections, trying to cut collapsed tissue, and thus accurate morphologic analysis is not possible
 In inhalation studies, and ESPECIALLY in experiments to assess METASTATIC ability of different malignancies, IT IS REALLY IMPORTANT to inflate the lungs with fixative. ALL LOBES SHOULD BE SEPARATED from each other, so that sections of each will be examined, with STEP SECTIONS, in order to detect small lesions.
To ensure that you will receive slides that will contain a particular abnormality that was visualized during necropsy, make sure you converse with the histotechnologist when you submit the sample, so that care will be taken to embed the area of interest, such that it will be immediately visible on the stained slide. Include a part of the normal tissue that surrounds the abnormal area, so that interpretation of the stained slide will be accurate.
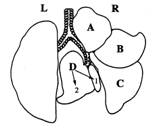
The HEART should be trimmed away to be examined separately, so that it will be possible to display all lobes of the lungs as shown.
The HEART may be divided into two halves, and fixed in a cassette along with a section from the Liver, Half of a kidney and with Salivary Glands--all may be fixed and processed in one block for embedding. Alternatively, the heart may be embedded separately, in specific ways, such that the valves may be viewed optimally, or embedded with the apex first, so that sections will reveal both ventricles for evaluation of thickness etc.
SPLEEN:

 FROZEN sections of spleen are good CONTROLS for immunohistochemistry for hematologic markers. For this, the entire spleen is embedded FLAT , at the BOTTOM of vinyl molds, in OCT , before immersion of the vinyl mold into a freezing slurry of dry ice and 2 methyl butane.
For Paraffin sections, the SPLEEN is enclosed between two sponges, so that it will lie flat in the cassette, BEFORE it is FIXED. This procedure ensures good, flat paraffin sections, without wrinkles.
If there are obvious nodules in the spleen, or it appears abnormal, make sure the histology personnel note the position of the abnormality , so that the specific region is EMBEDDED CORRECTLY, to ensure that the eventual section that will contain the area of interest for microscopic examination and further analysis.
PANCREAS
 The PANCREAS
 is the fatty appearing structure that appears adherent to the hilus of the spleen. Remove as much of the tan colored mass, closest to the spleen (this area usually contains a lot of the islets) and place
BETWEEN two sponges in an appropriately labeled embedding cassette BEFORE FIXING in buffered formalin. Good flat paraffin sections of this organ are more difficult to obtain if not fixed in this manner.
KIDNEYS Remember to carefully remove the two ADRENALS before dealing with the Kidneys. The adrenals also need special attention, because they are so small and will need to be placed in separate cassettes, perhaps with the OVARIES, which are also small. The Ovaries can be isolated at the same as time as harvesting the Adrenals and may not be easily visualized becasue they are surrounded by adipose tissue, in adjacent areas, ( or by following the Uterine horns up from the pelvis).
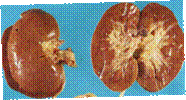 The KIDNEYS
 should be cut along the middle, into two parts, to reveal cortex and medulla and arcuate arteries, so that similar areas will be comparable, between littermate controls and in mutant animals,
for microscopic observation. Embed both sides flat surface down, onto the bottom of the embedding cassettes, so that the organ is fixed while flat and thus the sections will reveal better morphologic relationships
Remember to request that sections be made at less than 3 microns if possible, to ensure adequate examination of glomeruli. Additional special stains may be requested as well as immunohistochemistry
INTESTINAL TRACT: COLON, ILEUM Grasp the abdominal end of the esophagus and begin to disembowel the GI tract until the rectum is reached. Care should be taken not to stretch out the mesenteric fat so that harvesting of the mesenteric lymph nodes can be possible after fixation.
The small intestine should be sectioned into 4-5 parts before immersion fixation.
The epithelial cells of the intestinal tract autolyse readily and thus MUST be fixed As Soon As Possible . This may be EASILY accomplished by injecting fixative into the lumen. The small intestine may be cut up into smaller sections to allow the fixative to penetrate into the mucosa, and submitted for embedding, processing and sectioning, as tubes laid side by side.
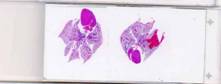
The COLON is dissected away from the rest of the bowel and IF IT IS important to document the presence of Epithelial Tumors or to doucment the presence of Ulcers, the colon MUST be opened along the anti-mesenteric aspect, and ROLLED , with the mucosal end facing outwards, so that fixative will reach all epithelium and it wil be possible to view the whole length of the colon, on one section. To do this GUT ROLL, take a swab stick, roll up the FRESHLY opened colon onto the stick so that a compact roll is the end result.
DO NOT TRY TO ROLL after rinsing the gut in PBS, it will not stick together to make a good roll.
Always use the same method to roll, anal end first always OR small intestine end first, on the inside of the roll.
Fix the rolled up colon on the stick, in a 15 ml tube with fixative and submit for histologic embedding and sectioning.


rolled up colon
on a stick
to be immersed
in fixative
BONE (usually from the femur and knee) should be fixed and decalcified before embedding and sectioning. Three days is usually sufficient for decalcification of mouse bone.
If you would like to do IMMUNOHISTOCHEMISTRY on sections from mouse femurs, fix the bones first in buffered formalin for two days, and then immerse in 5% EDTA for 3-5 days to decalcify, before submitting for processing snd embedding in paraffin blocks
The SKULL may also be decalcified and sectioned, to look for histopathologic changes in the nasal mucosa, get a better view of the PITUITARY, etc. The following two reagents are used routinely to help with the decalcification process, at a ratio of 10 volumes of reagent per volume of tissue:
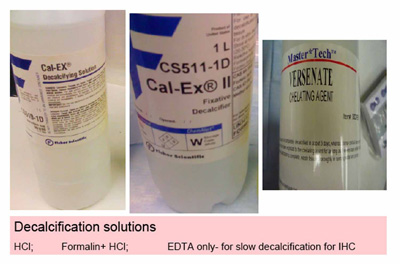
Cal-Ex -Fisher Cat. No. CS510-1D in glass jar or specimen cup
Or Cal-Ex II -Fisher Cat. No. CS511-1D in glass jar or specimen cup
1. Anesthetize the animals, sacrifice
2. remove the skin from the hip down, for both legs
3. remove the whole leg, on both sides
4. REMOVE AS MUCH MUSCLE as possible
5. fix in Cal-Ex II -Fisher Cat. No. CS511-1D
6. but do not let them be exposed to this for more than 3 days
7. after 3 days in Cal-Ex II, transfer the samples to 70% alcohol
8. call 534-2544
9. and arrange to bring the samples over to the lab here
10. so that the samples can be processed, embedded , sectioned and stained for viewing
Bibliography:
a) Pathology of the mouse. Ed. Robert R. Maronpot. Cache River Press
ISBN: 1-889899-02X
b) di Fiore’s Atlas of Histology. Victor P. Eroschenko Lee and Febiger
c) Histology. A text and Atlas. Ross, Romrell and Kaye. Williams and Wilkins
ISBN: 0-683-07369-9
d) Human Histology. Stevens and Lowe. Mosby. ISBN: 0-7234-2485-3
e) An Atlas of Histology. Zhang. Springer. ISBN: 0-387-94954-2
f) Pathologic Basis of disease. Robbins,Kumar and Collins. Saunders.
ISBN: 0-7216-7335-X
g) The Laboratory Mouse. Suckow, Danneman, Brayton. CRC Press
ISBN: 0-8493-0322-2
h) A Color Atlas of Sectional Anatomy of the mouse. Iwaki, Yamashita, Hayakawa.
Braintree Scientific Inc. ISBN: 4-900659-58-4
i) The Atlas of Mouse development. Kaufman. Academic Press.
ISBN 0-12-402035-6
j) The House Mouse. Atlas of Embryonic development. Theiler. Springer-Verlag
ISBN: 0-387-05940-7
k) Manipulating the mouse embryo, a laboratory manual. Hogan, Beddington, Costantini, Lacy. Cold Spring Harbor Laboratory Press ISBN: 0-87969-384-3